[Java] Java GUI로 채팅 어플 구현
📌 들어가며
이번 글에서는 Swing GUI로 채팅 앱을 만들면서, 클래스·객체·주소값 공유와 이벤트 리스너를 깊이 있게 익힌다. 두 개의 창(ChatA, ChatB)이 서로의 주소값을 주고받아 메시지를 공유하는 것이 핵심이다.
이번엔
java.awt대신 업그레이드 버전인javax.swing을 사용한다. (JFrame,JTextArea,JButton등)
1
2
3
ChatA (노란 창) ──open 버튼──► ChatB(하늘 창) 생성 + 서로 주소값 교환
     │                              │
     └── 입력+Enter ──► 양쪽 area에 메시지 append ◄──┘
1. ChatA — 컴포넌트 구성
생성자에서 스타일 → 조립 → 윈도우 설정 → 리스너 연결 순서로 만든다.
1
2
3
4
5
6
7
8
9
10
11
12
13
14
15
16
17
18
19
20
21
22
23
24
25
26
27
28
29
30
31
32
33
public class ChatA extends JFrame implements ActionListener, KeyListener {
    JTextArea area;
    JScrollPane scroll;
    JTextField t_input;
    JButton bt;
    ChatB chatB;   // has a (ChatB의 주소값을 가짐)

    public ChatA() {
        // 생성
        area = new JTextArea();
        scroll = new JScrollPane(area);   // 스크롤이 area를 품음
        t_input = new JTextField(20);
        bt = new JButton("open");

        // 스타일
        area.setPreferredSize(new Dimension(280, 320));
        area.setBackground(Color.YELLOW);

        // 조립 (JFrame 상속 → add 바로 사용)
        setLayout(new FlowLayout());
        add(scroll); add(t_input); add(bt);

        // 윈도우 설정
        this.setBounds(200, 100, 320, 420);   // x, y, 너비, 높이
        setVisible(true);
        setDefaultCloseOperation(EXIT_ON_CLOSE);

        // 리스너 연결
        bt.addActionListener(this);
        t_input.addKeyListener(this);
    }
    public static void main(String[] args) { new ChatA(); }
}
| 컴포넌트 | 역할 |
|---|---|
JScrollPane | JTextArea를 품어 스크롤 제공 |
setBounds(x,y,w,h) | 시작 좌표(좌상단 기준) + 크기 |
setDefaultCloseOperation(EXIT_ON_CLOSE) | X 버튼으로 전체 프로그램 종료 |
💡
add,setLayout을 선언 없이 쓰는 건 JFrame 상속 덕분이다. (this.생략)
2. 이벤트 리스너
리스너란? 키보드·마우스 신호는 OS→JVM으로 전달되는데, 기본값은 이를 우리에게 보여주지 않는다. 리스너(인터페이스)를 구현하면 그 신호를 받아 처리할 수 있다.
| 리스너 | 추상 메소드 | 발동 시점 |
|---|---|---|
ActionListener | actionPerformed | 버튼 클릭 등 |
KeyListener | keyPressed / keyReleased / keyTyped | 키 누름 / 뗌 / 입력 |
ActionListener — open 버튼
1
2
3
4
5
6
7
@Override
public void actionPerformed(ActionEvent e) {
    if (chatB == null) {                // 아직 없으면
        chatB = new ChatB();            // ChatB 창 생성
        chatB.setChatA(this);           // ChatB에 '나(ChatA)의 주소값' 전달
    }
}
💡
chatB.setChatA(this)가 핵심이다.new없이 ChatA 자기 자신의 주소값을 ChatB에 넘긴다. 그러면 ChatB도 ChatA를 가리키게 되어, 두 창이 서로의 주소값을 보유한다.
KeyListener — Enter로 메시지 전송
1
2
3
4
5
6
7
8
9
10
11
@Override public void keyPressed(KeyEvent e) {}
@Override
public void keyReleased(KeyEvent e) {
    if (e.getKeyCode() == KeyEvent.VK_ENTER) {   // 엔터일 때만
        String msg = t_input.getText();          // 입력값 가져오기
        chatB.area.append(msg + "\n");           // 상대 창에 출력
        this.area.append(msg + "\n");            // 내 창에 출력
        t_input.setText("");                     // 입력창 비우기
    }
}
@Override public void keyTyped(KeyEvent e) {}
💡
getKeyCode()는 입력 키를 정수로 알려준다. 엔터는 10인데, 자바는 이를 상수VK_ENTER로 정의했다.append()는 이어쓰기(setText()는 덮어쓰기)라, 채팅 기록을 쌓으려면append()를 쓴다.
3. ChatB — 주소값 받기
ChatB는 거의 같지만, ChatA의 주소값을 받는 setter가 핵심이다.
1
2
3
4
5
6
7
8
9
10
11
12
13
14
15
16
17
18
19
20
21
22
23
24
25
26
27
28
29
30
public class ChatB extends JFrame implements KeyListener {
    JTextArea area;
    JScrollPane scroll;
    JTextField t_input;
    ChatA chatA;

    public ChatB() {
        // (생성·스타일·조립·윈도우 설정 — ChatA와 유사, 배경은 cyan)
        area.setBackground(Color.cyan);
        this.setBounds(550, 100, 320, 420);
        setVisible(true);
        t_input.addKeyListener(this);
    }

    // ChatA가 자신의 주소값을 넘겨줄 통로
    public void setChatA(ChatA chatA) {
        this.chatA = chatA;
    }

    @Override
    public void keyReleased(KeyEvent e) {
        if (e.getKeyCode() == KeyEvent.VK_ENTER) {
            String msg = t_input.getText();
            chatA.area.append(msg + "\n");   // 상대(ChatA) 창에 출력
            this.area.append(msg + "\n");    // 내 창에 출력
            t_input.setText("");
        }
    }
    // keyPressed, keyTyped 생략
}
💡 ChatA의 open 버튼이 ChatB 생성자를 호출하면서
setChatA(this)로 주소값을 넘긴다. 그 결과 ChatA↔ChatB가 서로의 주소값을 보유하게 되어, 어느 쪽에서 입력해도 양쪽 area에 메시지가 나타난다.
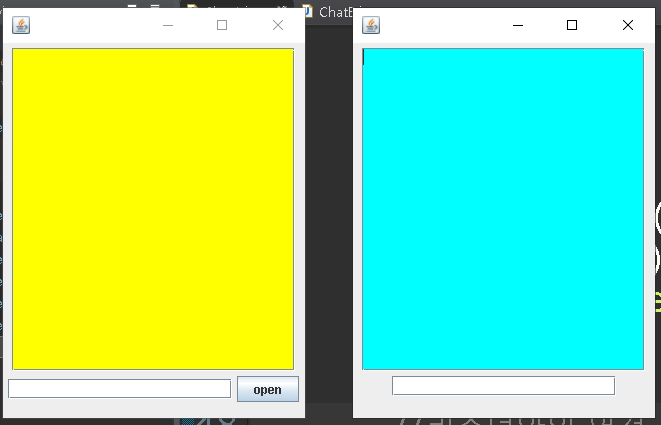
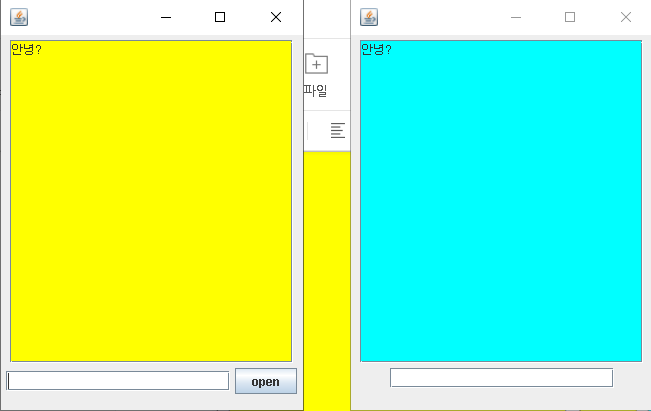
왼쪽(노랑) ChatA의 open을 누르면 오른쪽(하늘) ChatB가 뜨고, 한쪽에서 입력하면 양쪽 창에 동시 출력된다.
📝 정리
1
2
3
4
5
6
Swing 채팅 앱
├─ 구성      JFrame 상속 + JTextArea/JScrollPane/JTextField/JButton
├─ 순서      스타일 → 조립 → 윈도우 → 리스너 연결
├─ 리스너    ActionListener(클릭) / KeyListener(키)
├─ 주소값    setChatA(this)로 서로의 주소값 교환 → 메시지 공유
└─ append    이어쓰기 (setText는 덮어쓰기)
| 개념 | 한 줄 정의 |
|---|---|
| 리스너 | 사용자 이벤트를 받아 처리하는 인터페이스 |
| VK_ENTER | 엔터 키의 상수 |
| 주소값 공유 | 두 객체가 서로를 참조하게 만들기 |
| append | 텍스트 이어쓰기 |
이 채팅 앱의 진짜 학습 포인트는 UI가 아니라 “두 객체가 서로의 주소값을 주고받아 협력한다”는 객체 참조의 원리다. setChatA(this) 한 줄이 그 핵심을 담고 있다.
Comments powered by Disqus.